tistory에 블로그 포스팅을 시작했다.
그동안의 공부 흔적들은 notion, velog, github 잔디심기 곳곳에도 흩어져있었다 (여자의 마음은 갈대랄까..)
TIL을 tistory로 모두 이전하기로 마음먹었는데
tistory에 글을 포스팅 하면 자동으로 github과 연동되어 잔디가 심는 게 가능하다니..!
꿩먹고 알먹고 도랑 치고 가제 잡고 누이 좋고 매부 좋고
여기저기 포스팅을 써칭했는데 너무 간결하게 써진곳도 많고 직접 해보니 나에겐 너무 어려웠던 경험을 초보자에 맞게 정리해본다.
1. Tistory RSS 설정
설정-관리-블로그로 들어가 최하단의 기타 설정에서 RSS 전체공개 설정
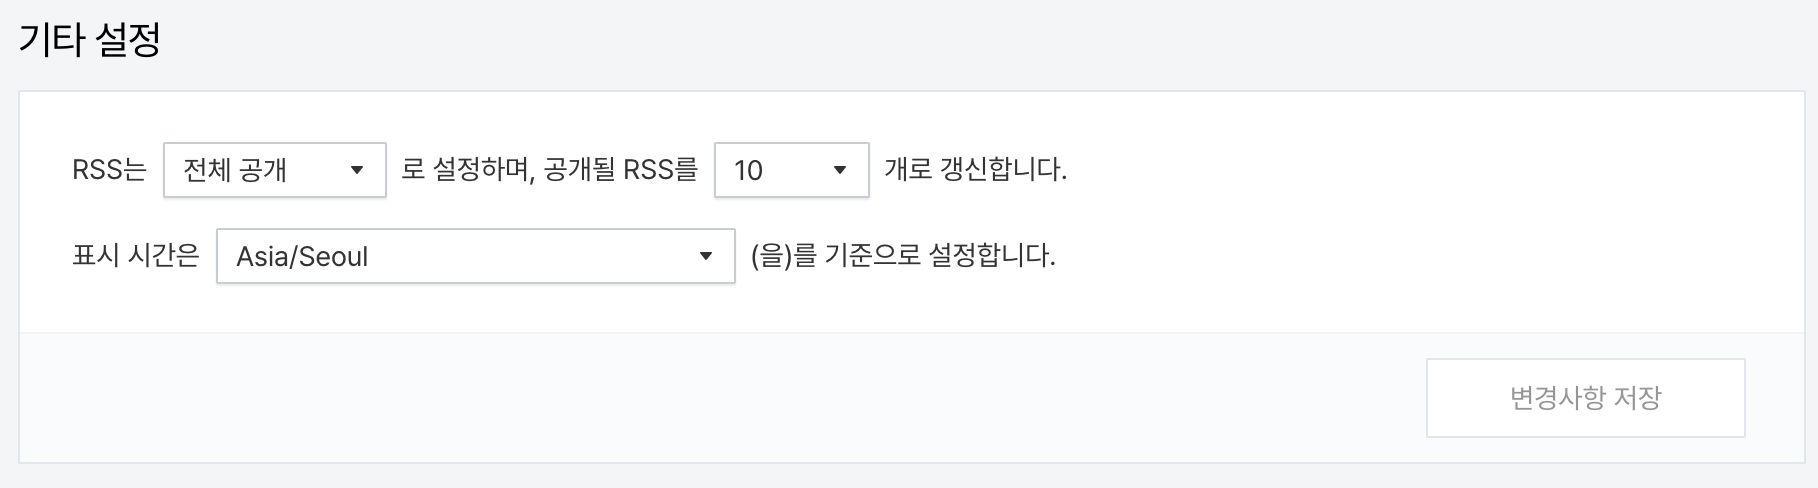
💡본인 블로그 주소/rss로 데이터가 잘 나오는지 확인해보기
ex) https://yeni-devnote.tistory.com/rss
2. Python 설치
1) 파이썬(Python) 설치
파이썬 공식 홈페이지에서 환경에 맞게 다운로드
https://www.python.org/downloads/
2) 파이썬에서 feed를 파싱할 수 있는 feedparser 라이브러리 설치
pip3 install feedparser💡 pip는 Pip Installs Packages의 약자로 Python 패키지를 설치하고 관리하는 패키지 매니저(Package Manager)이다.
MacOS의 brew, node의 npm, yarn, Linux에서 apt와 같은 개념
Python 3.4 이후 버전을 사용하고 있다면 pip가 내장되어 있어 따로 pip를 설치할 필요가 없다!
3. 프로젝트 루트에 py 파일 추가
나는 기존에 사용하던 TIL 레포지토리를 사용하였고 해당 프로젝트 루트에 readme_update.py 파일을 만들었다!

readme_update.py
import feedparser, datetime
import ssl

# SSL 인증서 검증 무시
ssl._create_default_https_context = ssl._create_unverified_context

tistory_uri="https://yeni-devnote.tistory.com/"
feed = feedparser.parse(tistory_uri+"/rss")

markdown_text = """
### Hi there 👋

### 📖   Interest
     - FrontEnd
     - BackEnd
     - ...


### 📕 Latest Blog Posts

""" # list of blog posts will be appended here

lst = []


for i in feed['entries'][:3]:
#     dt = datetime.datetime.strptime(i['published'], "%a, %d %b %Y %H:%M:%S %z").strftime("%b %d, %Y")
#     markdown_text += f"[{i['title']}]({i['link']}) - {dt}<br>\n"
#     markdown_text += f"{i['title']} {i['link']} <br>\n"
    markdown_text += f"<a href =\"{i['link']}\"> {i['title']} </a> <br>"


    print(i['link'], i['title'])

f = open("README.md",mode="w", encoding="utf-8")
f.write(markdown_text)
f.close()
위 코드는 Tistory 블로그의 최신 게시물을 가져와서 README.md 파일을 업데이트 시키는 기능이다.
(Latest Blog Posts에 자동으로 게시된 글 목록이 쌓이게 만들었다.)
4. github Action을 위한 폴더 및 yml 파일 생성
루트에 ".github" 폴더 생성 ("." 빼먹기 않기) - 하위에 "workflows" 폴더 생성 - 하위에 "main.yml" 파일 생성
# This is a basic workflow to help you get started with Actions
name: Readme Update

# Controls when the workflow will run
on:
  # Triggers the workflow on push or pull request events but only for the master branch
  push:
    branches: [main]
  pull_request:
    branches: [main]
  schedule:
    - cron: "0 0 */1 * *"

# A workflow run is made up of one or more jobs that can run sequentially or in parallel
jobs:
  # This workflow contains a single job called "build"
  build:
    # The type of runner that the job will run on
    runs-on: ubuntu-latest
    # Steps represent a sequence of tasks that will be executed as part of the job
    steps:
      # Checks-out your repository under $GITHUB_WORKSPACE, so your job can access it
      - uses: actions/checkout@v2
      - name: Set up Python 3.12.2
        uses: actions/setup-python@v2
        with:
          python-version: "3.12.2"
      - name: Install dependencies
        run: |
          python3 -m pip install --upgrade pip
          pip3 install feedparser
      - name: Update README
        run: |
          python3 readme_update.py

      - name: Commit README
        run: |
          git pull
          git add .
          git diff
          git config --local user.email "lovableun90@gmail.com"
          git config --local user.name "devyeeun"
          git commit -m "Update README.md"
          git push
[코드 해석]
이 GitHub Actions workflow는 다음을 수행합니다 :
1. main 브랜치로의 push 또는 pull request 이벤트 발생 시 workflow가 트리거됩니다.
2. 매일 자정마다 schedule을 통해도 workflow가 트리거됩니다.
3. ubuntu-latest 러너에서 실행됩니다.
4. 작업은 단일 작업인 build로 구성됩니다.
5. 작업은 다음 단계를 실행합니다 :
1) GitHub Actions가 코드를 실행하기 전에 리포지토리를 체크아웃합니다.
2) Python 3.12.2를 설정합니다.
3) 종속성을 설치합니다. 이 경우, feedparser를 설치합니다.
4) readme_update.py 스크립트를 실행하여 README를 업데이트합니다.
5) 업데이트된 README를 커밋하고 푸시하여 리포지토리에 적용합니다.
이 workflow를 사용하여 README가 자동으로 업데이트되며, 업데이트가 발생할 때마다 커밋되고 push됩니다.
push 하거나 스케쥴을 통해 github Action workflow가 자동 실행되면서 README를 업데이트 한다.
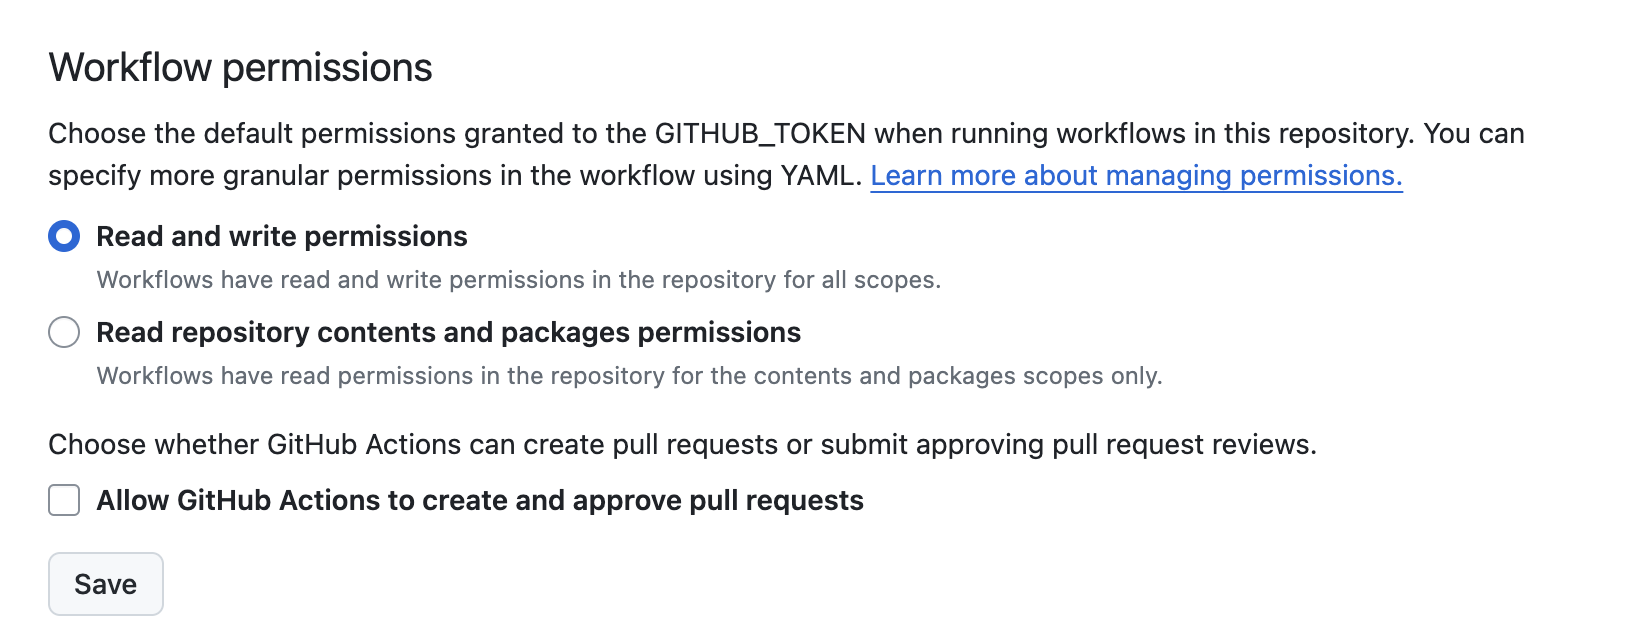
❗️403 오류, permission 오류가 날 경우
해당 repository로 이동 👉🏻 Settings 👉🏻 Actions 👉🏻 general 👉🏻 Workflow permissions 부분에서 Read and write permissions 로 변경해준다!